Yes I am a silk snob
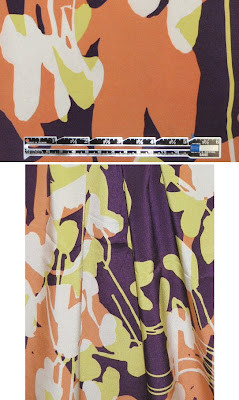
I tried on this henley tank in Target the other day and loved the shape, but not the fabric. It was polyester and already clinging to me in the dressing room. Fortunately I've got a nice stash of silk prints, including this Cynthia Steffe print from Emma One Sock a few years ago.
I used some old poly to drape the shape on my dressform, cutting and pinning until I was happy with the neckline, armholes, and width. Then I took it apart, traced the pieces onto butcher paper with my tracing wheel, and balanced the pattern so both sides would match. I added seam and hem allowances and the pattern was ready to go.
I used my favorite neckline/armhole binding technique, applied with my industrial right angle double-fold clean finish binder, then turned to the inside and topstitched. I chose not to staystitch the armholes, but ended up handling the fabric more than I usually do so I got some stretching in that area. It's not horrible but usually this binding technique lies perfectly flat or even hugs the body, and it's standing away a bit in the armholes. Lesson #1: Always stabilize bias areas shortly after cutting to preserve the shape.
I used this method to make the neckline placket, I had used it before on the sleeves of one of DH's shirts and found it simple. Not quite as accurate as I'd like, and I had issues with the dimensions given for the strip. (I used a 2 inch strip to begin with). One of these days I need to try two-piece plackets. Also, I only used interfacing on 1/2 the strip, I was worried about making the placket too stiff in this lightweight silk. However this wasn't enough stabilization, the buttonholes distorted the strip a bit. I used the lightest weight interfacing I had, and it probably would have been fine interfacing the whole strip. Lesson #2: Always stabilize openings.
Even with the issues listed, I still love the tank and will get a lot of use out of it this summer. It's a great shape and length to go with skinny pants and jeans.
Here is the construction order (all done on Juki industrial straight stitch):
I used some old poly to drape the shape on my dressform, cutting and pinning until I was happy with the neckline, armholes, and width. Then I took it apart, traced the pieces onto butcher paper with my tracing wheel, and balanced the pattern so both sides would match. I added seam and hem allowances and the pattern was ready to go.
I used my favorite neckline/armhole binding technique, applied with my industrial right angle double-fold clean finish binder, then turned to the inside and topstitched. I chose not to staystitch the armholes, but ended up handling the fabric more than I usually do so I got some stretching in that area. It's not horrible but usually this binding technique lies perfectly flat or even hugs the body, and it's standing away a bit in the armholes. Lesson #1: Always stabilize bias areas shortly after cutting to preserve the shape.
I used this method to make the neckline placket, I had used it before on the sleeves of one of DH's shirts and found it simple. Not quite as accurate as I'd like, and I had issues with the dimensions given for the strip. (I used a 2 inch strip to begin with). One of these days I need to try two-piece plackets. Also, I only used interfacing on 1/2 the strip, I was worried about making the placket too stiff in this lightweight silk. However this wasn't enough stabilization, the buttonholes distorted the strip a bit. I used the lightest weight interfacing I had, and it probably would have been fine interfacing the whole strip. Lesson #2: Always stabilize openings.
I used an industrial wire hemmer attachment to turn the 3/16" hem, I haven't perfected my technique with it yet but it's passable and so much faster than any other method that I just keep trying to do better each time.
Even with the issues listed, I still love the tank and will get a lot of use out of it this summer. It's a great shape and length to go with skinny pants and jeans.
Here is the construction order (all done on Juki industrial straight stitch):
- French seam one shoulder seam.
- Bind sewn armhole and neckline. (right angle binder)
- French seam other shoulder seam. (on Janome machine to avoid taking binder off Juki)
- Bind other armhole
- French seam side seams.
- Hem (3/6" wire hemmer)
- Turn in and press neckline/armhole binding, topstitch.
- Mark and cut slit for placket
- Sew placket strip to opening, press into shape and topstich.
- Buttonholes (Janome)
- Buttons (Janome)


Comments
Post a Comment