6 muslins later...
My hard-earned lesson for the week: Copying RTW is only worthwhile when the garment in question actually FITS. If you need to make a lot of adjustments you might as well start with a pattern. (Like this Vogue, thanks Carol!) The J.Crew dress I borrowed was 1-2 sizes small for me, with enough room for maybe an A-cup bust. I didn't think it would be as hard as it was to make it work, but I essentially ended up grading the entire thing, as well as fuss with a large FBA that created even more problems.
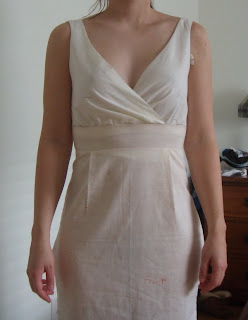
Here is my 4th or 5th muslin, I lost count after about number 3. I don't know how many times I had to increase the size of those 2 tucks on the bodice, after taking out a dart at a gaping armhole or neckline and transferring it to the bust darts. I also had to realign the shoulder straps, all those armhole adjustments finally pulled them out of position. And I must mention the importance of tracing off your last pattern attempt onto a fresh piece of paper before mangling it, that way you have a record of each step and can go back if needed. In this case I pulled out one of the earlier patterns to check the angle of the shoulder strap, realized it had become tilted, and retraced the old onto the new, reblending the upper neckline and armhole. I also drew a new back neckline so it dips into a shallow V, deepened the back darts, and shortened the back lengths of the skirt and the upper bodice.

Again, this was not my first muslin here. I kept trying to mess with the back darts as well as the CB seam, which obviously wasn't working.
I ran out of muslin and decided to use some leftover linen, it has similar drape and shiftiness to the 4-ply silk I'll be using. I took out 3/8" in length at the CB on the bodice and skirt backs, tapering to nothing at the side seam, leaving the band alone. I redrew the darts as well, making them shaped as opposed to straight. For this muslin I just pinned the side seams on the outside, they were swinging to the front on the last muslin so I knew I would need to realign them. It's always helpful to have large seam allowances at this stage for doing that.

Here is my 4th or 5th muslin, I lost count after about number 3. I don't know how many times I had to increase the size of those 2 tucks on the bodice, after taking out a dart at a gaping armhole or neckline and transferring it to the bust darts. I also had to realign the shoulder straps, all those armhole adjustments finally pulled them out of position. And I must mention the importance of tracing off your last pattern attempt onto a fresh piece of paper before mangling it, that way you have a record of each step and can go back if needed. In this case I pulled out one of the earlier patterns to check the angle of the shoulder strap, realized it had become tilted, and retraced the old onto the new, reblending the upper neckline and armhole. I also drew a new back neckline so it dips into a shallow V, deepened the back darts, and shortened the back lengths of the skirt and the upper bodice.
Not bad, but still too much ease under the bust, and small diagonal drag lines on the skirt.

Again, this was not my first muslin here. I kept trying to mess with the back darts as well as the CB seam, which obviously wasn't working.
I ran out of muslin and decided to use some leftover linen, it has similar drape and shiftiness to the 4-ply silk I'll be using. I took out 3/8" in length at the CB on the bodice and skirt backs, tapering to nothing at the side seam, leaving the band alone. I redrew the darts as well, making them shaped as opposed to straight. For this muslin I just pinned the side seams on the outside, they were swinging to the front on the last muslin so I knew I would need to realign them. It's always helpful to have large seam allowances at this stage for doing that.
Another small gaping neckline adjustment, which worked, as well as rotating some fabric out of the front skirt darts toward the side seam, to fix the diagonal drag lines.

I started on one more muslin this weekend, after realigning the side seams and adjusting the back bodice length I thought I should check it again, as well as figure out the construction order for the full lining. I am so glad I did, as it turned out to be somewhat difficult with that crossover neckline. I think I successfully reverse-engineered the method used on the J.Crew dress, thankfully I took pictures before I sent it back (whew!). My next post will detail the procedure I came up with.
One more tip to take home: Inserting a zipper to test fit is really easy. I don't have a dressform or a nearby sewing buddy so I rely on this. Just sew your seam normally with a long stitch length, press the seam open, and pin any kind of zipper you have on hand to the inside of the garment, with the zipper closed. Just line up the teeth with the seam. You can even use invisible zippers, it doesn't matter because all you are doing is topstitching it. Sew down one side of the zipper, close to the teeth if you can, then the other. Inside of the garment is on top. Once the zipper is sewn in, run your seam ripper down the basted seam on the outside of the garment, and that's it. Takes me no more than 5 minutes now, and is much more accurate than pinning, especially with a fitted garment.
One more tip to take home: Inserting a zipper to test fit is really easy. I don't have a dressform or a nearby sewing buddy so I rely on this. Just sew your seam normally with a long stitch length, press the seam open, and pin any kind of zipper you have on hand to the inside of the garment, with the zipper closed. Just line up the teeth with the seam. You can even use invisible zippers, it doesn't matter because all you are doing is topstitching it. Sew down one side of the zipper, close to the teeth if you can, then the other. Inside of the garment is on top. Once the zipper is sewn in, run your seam ripper down the basted seam on the outside of the garment, and that's it. Takes me no more than 5 minutes now, and is much more accurate than pinning, especially with a fitted garment.


Comments
Post a Comment